Battery switch on travel trailer function is crucial for managing your RV’s power. Understanding how your battery switch works – whether it’s a simple single-pole or a more complex double-pole double-throw model – is key to safe and efficient RVing. This guide will walk you through the different types, their functionalities, troubleshooting common issues, and essential maintenance tips, ensuring you’re always powered up and ready for adventure.
We’ll cover everything from choosing the right switch for your setup to understanding the interplay between your battery switch, converter, inverter, and solar panels. We’ll even provide practical steps for operating your switch in various situations, such as connecting to shore power or relying solely on your house batteries. Get ready to become a battery switch expert!
Battery Switch Types in Travel Trailers
Choosing the right battery switch for your travel trailer is crucial for managing your power system efficiently and safely. Different types offer varying levels of control and complexity, impacting both your setup and overall cost. Understanding these differences will help you make an informed decision.
Single-Pole Battery Switches
Single-pole switches are the simplest type. They offer a single on/off function, connecting either the house battery or the chassis battery to the trailer’s electrical system. They’re generally inexpensive and easy to install, making them a popular choice for smaller trailers or those with basic power needs. However, they only allow for the use of one battery at a time.
You can’t charge both batteries simultaneously, and switching between them requires turning the switch off and then on again.
Double-Pole Battery Switches
Double-pole switches provide more control than single-pole switches. They allow you to connect either the house battery or the chassis battery independently to the trailer’s electrical system, or to disconnect both completely. This provides better control over power usage and helps prevent accidental cross-connections that could damage your batteries or electronics. While more complex than single-pole switches, they are still relatively straightforward to install.
Double-Pole Double-Throw (DPDT) Battery Switches
DPDT switches are the most versatile option. These switches offer the functionality of a double-pole switch, but they also allow you to connect both the house battery and the chassis battery to the trailer’s system simultaneously. This is particularly useful for larger trailers with high power demands, or those who frequently use power-hungry appliances. However, they are also the most complex to install and generally the most expensive.
Comparison of Battery Switch Types
| Feature | Single-Pole | Double-Pole | Double-Pole Double-Throw (DPDT) |
|---|---|---|---|
| Number of Batteries Controlled | One at a time | One at a time, or both off | One, both, or neither |
| Simultaneous Charging | No | No | Yes |
| Complexity | Low | Medium | High |
| Cost | Low | Medium | High |
| Installation Difficulty | Easy | Moderate | Difficult |
Wiring Diagrams
A single-pole switch simply connects one battery to the load. A double-pole switch has two sets of contacts, allowing for the independent control of each battery. A DPDT switch has four terminals and two positions, allowing for the selection of either battery, both batteries, or neither. Detailed wiring diagrams are readily available online and in RV electrical manuals, but are beyond the scope of this simplified explanation.
The complexity of the wiring reflects the increased functionality of each switch type. Always consult a qualified electrician if you are unsure about wiring your battery switch.
Function and Purpose of the Battery Switch
The battery switch in your travel trailer is a crucial component that controls the flow of power between your various battery banks. Understanding its function and proper operation is key to preventing electrical problems and ensuring safe and reliable power for your RV. It’s essentially a master control, allowing you to isolate or connect different battery systems as needed.The primary function of the battery switch is to manage the power flow between the house batteries (which power the interior lights, appliances, and other systems within your trailer) and the chassis battery (which powers the vehicle’s starting system).
This allows you to conserve house battery power when the trailer is disconnected from shore power or a generator, and to prevent accidental draining of the chassis battery. The switch typically allows for several positions, enabling you to completely disconnect both batteries, connect only the house batteries, connect only the chassis battery, or connect both batteries together.
Battery Switch Operation and Power Management
The battery switch acts as a gatekeeper for electrical current. In the “off” position, both the house and chassis batteries are completely isolated, preventing any power flow between them or to any connected loads. This is essential for long-term storage to avoid battery drain. The “house” position connects only the house batteries to the trailer’s electrical system.
So, you’re an audiophile who travels? Awesome! Check out this guide on creating the perfect audiophile travel setup for amazing sound on the go. It’s all about portability without sacrificing quality. Then, for even more tips and tricks on maximizing your mobile audio experience, head over to this other great resource: audiophile travel aetup.
Between these two, you’ll be rocking out in style, no matter where your adventures take you!
This is ideal when you’re using the trailer’s internal systems without running the engine or being connected to shore power. The “both” position connects both the house and chassis batteries together, providing increased power capacity, often useful when running high-draw appliances or charging house batteries from the alternator. The “chassis” position is typically only used for starting the tow vehicle; it connects only the chassis battery to the starting system.
Safety Implications of Improper Battery Switch Usage
Improper use of the battery switch can lead to several safety hazards. Leaving the switch in the “both” position while the trailer is in storage can lead to complete discharge of both batteries, rendering them unusable and potentially causing damage. Conversely, leaving the switch in the “off” position while trying to use trailer appliances will result in no power to those appliances.
Furthermore, accidentally connecting the house and chassis batteries while there’s a short circuit in the house system could drain the chassis battery quickly, preventing you from starting your tow vehicle.
Correct Battery Switch Operation in Various Scenarios
Proper operation is straightforward but crucial. Here’s a step-by-step guide for common scenarios:
- Connecting to Shore Power: With the trailer connected to shore power, you can typically leave the battery switch in the “both” position. This allows the shore power to charge both batteries. If your system prioritizes charging the house batteries first, you might initially leave it in the “house” position, switching to “both” once the house batteries reach a sufficient charge.
- Disconnecting from Shore Power: Before disconnecting from shore power, it’s recommended to switch to the “house” position. This allows you to continue using the trailer’s systems until the house batteries are depleted. Once they are low, switching to “off” prevents further discharge.
- Using Only House Batteries: When using the trailer’s systems without shore power or a generator, use the “house” position. This ensures that only the house batteries are used, conserving the chassis battery’s charge for starting the tow vehicle.
- Starting the Tow Vehicle: To start the tow vehicle, ensure the switch is in the “chassis” or “both” position, providing adequate power to the starting system.
- Long-Term Storage: For extended periods of storage, always turn the battery switch to the “off” position. This prevents parasitic drain and ensures the batteries remain charged for future use. Periodically check the batteries’ state of charge during extended storage.
Troubleshooting Common Battery Switch Issues: Battery Switch On Travel Trailer Function
Your travel trailer’s battery switch is a crucial component, ensuring you can easily manage power to your appliances and systems. Problems with this switch can leave you stranded without power, so understanding common issues and troubleshooting steps is essential for a smooth camping experience. This section details how to diagnose and fix problems with your battery switch.
Common problems with travel trailer battery switches often manifest as a complete lack of power, blown fuses, or excessive heat from the switch itself. These issues can stem from a variety of causes, ranging from simple loose connections to more serious internal failures within the switch. Correct diagnosis is key to effective repair.
Identifying Common Battery Switch Problems
A non-functional battery switch will prevent power from reaching your trailer’s house batteries. This is typically noticeable by a lack of power to appliances and lights. Blown fuses, often located near the switch or within the battery’s distribution panel, indicate an overload or short circuit somewhere in the system. Overheating of the switch itself suggests a problem with high current draw, a loose connection creating resistance, or an internal failure within the switch.
So, you’re an audiophile who travels? Awesome! Check out this guide on building the perfect audiophile travel setup for amazing sound on the go. It’s all about finding the right balance between portability and quality. Then, once you’ve got your portable rig dialed in, head over to audiophile travel aetup for some seriously killer headphone recommendations to complete your mobile listening experience.
You’ll be amazed at how good music can sound, even when you’re miles from home!
Sometimes, a clicking sound from the switch indicates a problem with the switch’s internal mechanism, preventing it from making a proper connection.
Troubleshooting Steps for Battery Switch Malfunctions, Battery switch on travel trailer function
Before you start, always disconnect the negative battery cable to prevent accidental shocks. First, visually inspect the switch for any obvious signs of damage, loose connections, or corrosion. Tighten any loose connections. Check the fuses both near the switch and in the main distribution panel. Replace any blown fuses with fuses of the correct amperage rating.
If the problem persists, carefully examine the wiring connected to the switch for any damage or breaks. If the switch itself seems faulty, and you are comfortable doing so, you can try to clean the switch contacts with a wire brush or electrical contact cleaner. If none of these steps resolve the issue, the switch may need to be replaced.
Checking Battery Switch Functionality with a Multimeter
A multimeter is an invaluable tool for verifying the functionality of your battery switch. With the switch in the “on” position, connect the multimeter’s probes to the input and output terminals of the switch. You should read a voltage reading close to the battery’s voltage (typically around 12V for a 12V system). If you read a significantly lower voltage or zero voltage, the switch is likely faulty.
Repeat this test with the switch in the “off” position. You should read near zero voltage. A reading close to the battery voltage indicates a problem with the switch remaining closed when it should be open. If the multimeter consistently shows incorrect readings, it is a strong indication that the switch is malfunctioning and needs to be replaced.
Troubleshooting Flowchart for a Malfunctioning Battery Switch
Imagine a flowchart with the following structure:Start -> Visual Inspection (Loose connections, corrosion, damage?) -> Yes (Tighten connections, clean corrosion) -> Test Functionality (Multimeter) -> Yes (Problem Solved) -> End. No (Check Fuses) -> Yes (Replace blown fuses) -> Test Functionality -> Yes (Problem Solved) -> End. No (Check Wiring for damage) -> Yes (Repair/replace wiring) -> Test Functionality -> Yes (Problem Solved) -> End.
No (Replace Battery Switch) -> End.
Battery Switch and Related Components
The battery switch is the central control point for your travel trailer’s 12-volt DC system. Understanding its relationship with other electrical components is crucial for safe and efficient power management. A properly functioning battery switch ensures that power flows correctly to various systems, preventing damage and maximizing battery life.The battery switch acts as a gatekeeper, controlling the flow of power from your trailer batteries to other essential electrical components.
It works in conjunction with the converter, inverter, and solar panels to provide and regulate power throughout your RV. The interaction between these components determines how power is sourced, stored, and used within your trailer.
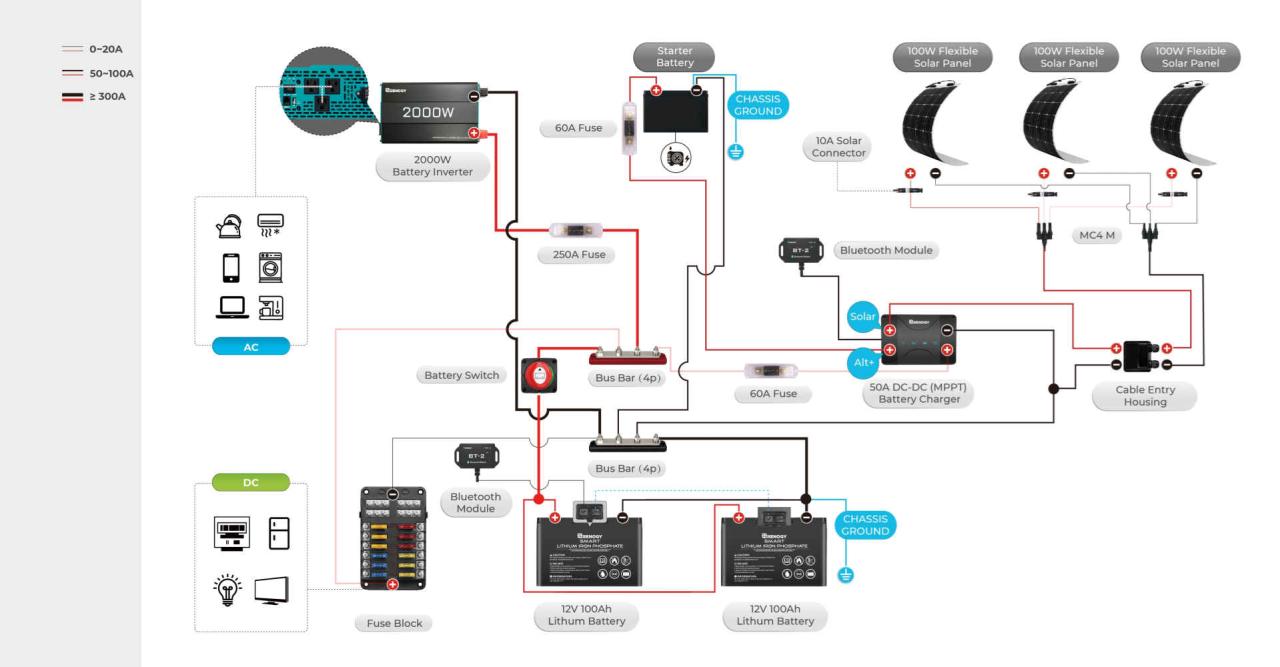
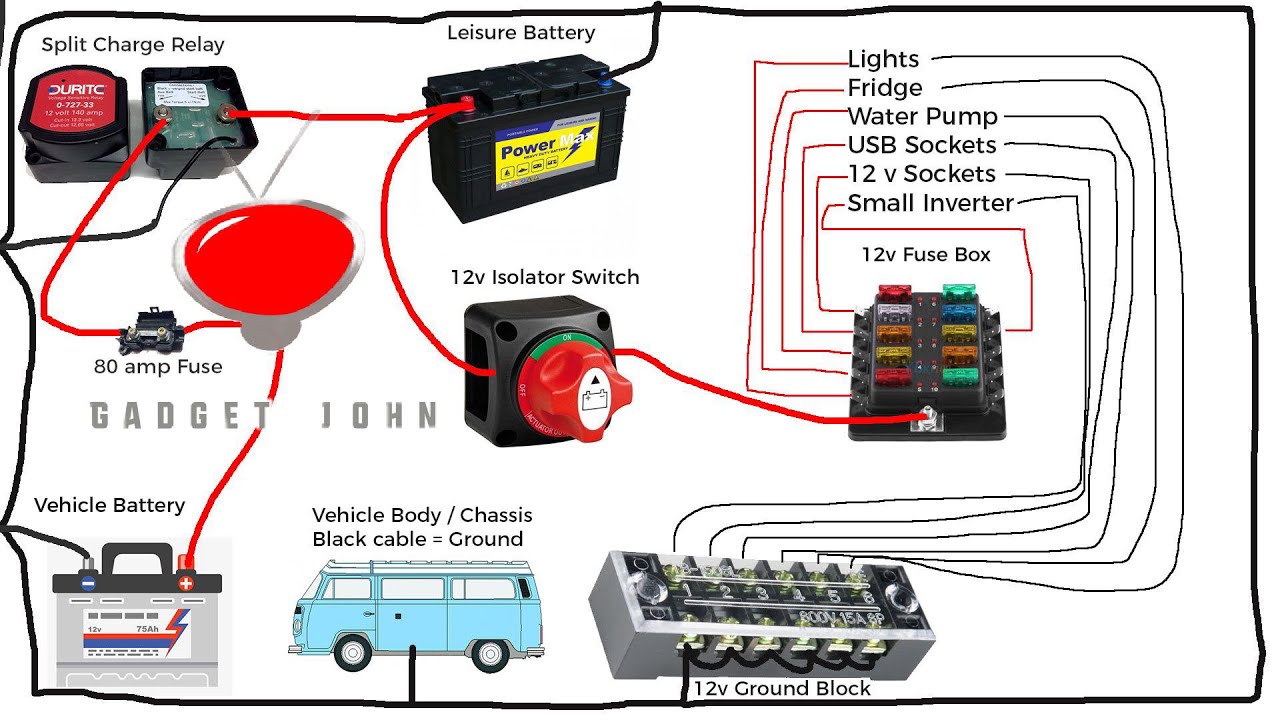
Battery Switch Connections and Power Distribution
The diagram below illustrates a typical setup showing how the battery switch connects to the main electrical components. The diagram shows the battery switch in the center, directly connected to the trailer batteries. From the switch, power flows to the converter (which transforms shore power (120VAC) to 12VDC for charging the batteries and powering 12VDC appliances), the inverter (which converts 12VDC to 120VAC for AC appliances), and the solar charge controller (which manages the power from solar panels to charge the batteries). The choice of “OFF,” “Battery,” or “Battery & Shore” position on the switch determines which power sources are active and which components receive power.
Impact of a Faulty Battery Switch
A malfunctioning battery switch can have significant consequences. For example, a switch stuck in the “ON” position might drain your batteries even when the trailer isn’t in use. Conversely, a switch that’s stuck in the “OFF” position will prevent power from reaching your appliances and charging systems, leaving you without lights, water pump, or other essential functions. A faulty switch can also lead to short circuits, potentially damaging other electrical components in your trailer.
In extreme cases, a short circuit could even create a fire hazard. Regular inspection and maintenance of the battery switch are essential to prevent these issues.
Mastering your travel trailer’s battery switch isn’t just about keeping the lights on; it’s about ensuring safe and reliable power management for your entire RV system. By understanding the different switch types, their functions, and how to troubleshoot common problems, you’ll be equipped to handle any power situation with confidence. Remember regular maintenance is key to preventing issues and extending the life of your battery switch.
Happy travels!
Questions and Answers
What happens if I leave my battery switch on all the time?
Leaving your battery switch on constantly can drain your batteries, especially if you’re not connected to shore power. This can lead to dead batteries and potential damage to your RV’s electrical system.
How do I know which type of battery switch I have?
Check the switch itself for markings indicating the type (e.g., single-pole, double-pole, DPDT). You can also look at the wiring diagram in your RV’s manual or consult a qualified RV technician.
My battery switch is hot to the touch. Is this normal?
No, a hot battery switch is not normal and indicates a potential problem. Turn off the switch immediately and consult a qualified technician. This could be a sign of a loose connection or a faulty switch.
Can I replace my battery switch myself?
While possible, replacing a battery switch requires electrical knowledge and working with potentially dangerous voltages. If you’re not comfortable working with electricity, it’s best to hire a qualified RV technician.
